


Fitting and Adjusting the Mudtrooper Armor
This is a quick tutorial on how to finish out your Mudtrooper kit.
Fitting
The first thing you want to do it to fit out your armor and trim or bend any parts than need adjusting. We make the sides on the back and front much longer than needed so that this can be done and if needed the parts can be cut and epoxied in place for a better fit. Its much easier to cut out fiberglass and make it smaller than it is to make it bigger.
A word about fiberglass verses plastic armor. Fiberglass is a much more repairable and customizable material than plastic is. Though plastic can be bent and trimmed, if you damage the surface or crack it your pretty much done. Fiberglass on the other hand can easily be cut and bonded back together, holes filled, scrapes or dents filled, sanded, and painted to look like new. Don't be afraid of working with it. We have already done the hard parts of molding and making the details for you. If you need to make changes for sizing or repair your kit it can easily be done with a simple fiberglass repair kit from any auto parts store. Hopefully though we can get a good fit without much work.
Start by getting a friend to help you. You will also need a marker, strong tape, a heat gun, a couple of tubes of Epoxy Glue, and a Rotary Tool (Dremel).
You want to do this part with a jacket on like what you will be wearing with the final costume. You don't want to make changes and later find that you need it bigger because of the jacket. Get some take and tape the two armor halves together at the shoulder. Your friend can help with this while you hold the armor in place. Don't worry yet if it it too big at this point. We are going to bring it in.
Your going to want to make two different adjustments to the armor width and depth. Your first going to want to adjust the width. This is done on both the front and back. We want to start with the back. We molded the back to be pretty wide so it will accomodate most troopers. Start by putting the armor in place and having your friend carefully measure how far in the back sides need to be brought in. Measure this twice and be sure. There are two ways to bring it in. Either by heat and bending or by trimming. If you need to bring in more than an inch, then we recommend trimming.
Trimming the back. To bring in the width, you are going to cut the armor on a line parallel with angled stripe that is on each sides. You want to cut the same place on both sides. If you need to bring in the total width 2 inches, then measure 1 inch on each side. Use either masking tape or a marker to make a line here.
Once you are happy with your measurments, use your rotary tool and a reinforced cut off wheel to make a cut in the armor along these lines.

You then want to mix up enough of your epoxy glue to cover the edge of the part with a good amount of glue.

Clamp these parts in place lining the edge up with the seam in the other peice as shown.

Once the glue has curred well, remove the clamps. Using some sand paper you can smooth the line along the diagonoal seam. You can also trim the line along the bottom of the armor so that it all lines up. If you want to make it really finished off you can use some body filling putty such as Bondo to fill in the area where you cut to make it seamless and ready for paint.

If you don't need much adjustment, then you can use the heat and bend method which is also how we are going to do the front. This only takes about 10 minutes and is very easy on this kit. Fiberglass can be bent, but it will go back to its origianal shape one the pressure is taken off. To get it to hold its shape you need to heat it with a heat gun. How much it can be brought in can be determines by applying gentle pressure on the armor before its heated and seeing how far it gently bends.

Be sure to wear gloves, preferable leather while doing this. Both the heat gun and the parts will get hot. Use a medium heat and heat from the BACK or unfinished side of the fiberglass. Our heat gun says 570 degrees Farenheit or 300 degrees Celcius. Wave the gun back and forth over the surface about 4-6 inches away slowly heating up the area you want to bend. Begin applying gentle pressure on the part bending it in slightly more than you want the final resting spot to be. You will notice the area becoming softer, do not burn it. Once it becomes soft take away the heat and hold it in this position for about 5 minutes while it cools. It will want to go back into its former shape until it cools so be patient. Check your results. If it needs more then repeat. Do not over bend or over heat in this process or you will create a crease. Be patient.
You can see in this photo we were able to recurve the front side to bring it in quite a bit.

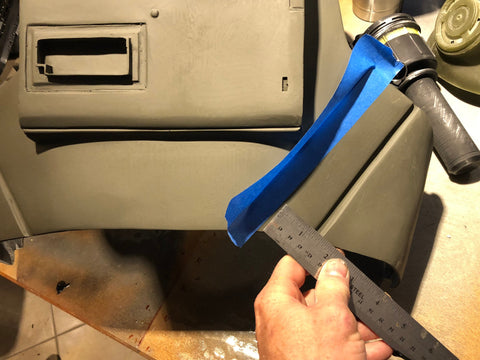
The next step is to trim the sides of the front armor to adjust the depth. You can see that we have molded in areas in the back armor where the front sides should meet up and be velcroed together. You want to put your armor back on and have your friend clearly mark with tape or a marker where the sides need to be trimmed to meet up with this spot. Double check this measurement and how well it lines up with the back tab, and trim it with the rotary tool and cutting wheel.


Once this is done, clamp the peices together and trim or sand everything so that all the lines line up and everything is smooth.
The final step in adjustment is to adjust the kneck tusks so they line up with the changes you made. This is done by using the same heating method used above. Put the two halves of the armor together and make careful note of where the tusks need to land. Heat the fiberglass from the back and move them into place and hold. Be carefull with these because they are smaller and will heat up faster.

Now your ready to put on the straps and the backpack greebles!